Robot microcontroller
A robot microcontroller is basically the brain of the robot. It is used to collect the information from various input devices such as sensors, switches and others. Then it executes a program and in accordance with it controls the output devices such as motors, lights and others.
As you can understand, microcontrollers are very useful devices that can be used in many applications not only robotics. Actually, they are used almost everywhere where it is required to control some output parameters in correspondence with some input parameters in other words – to execute a logic.
Are they used in computers? No, they are not. The computing done in PCs is much more complicated. So PCs have separate processing units, memories, etc. Microcontrollers have all needed things to do the computing incorporated into one IC (integrated chip).
Of course, microcontroller’s performance can seem like nothing if compared to that of a PC. Nevertheless, there are many applications where that is enough. Let’s take an alarm clock as an example. You have to show the time, ring when needed and control it with buttons. You don’t need a PC to do that.
The same goes for robots, especially for hobbyist applications. Usually, the computing tasks are quite simple. Something like – if there is a signal in the first input you have to give a signal in the third output. OK, maybe a bit more complicated than that.
MCU
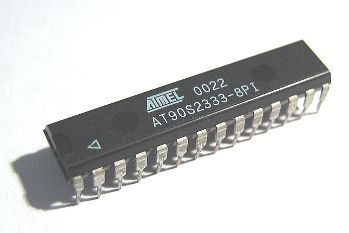
MCU stands for Microcontroller Unit. Basically this is the microcontroller. If you do a Wikipedia search on microcontrollers you will find information on MCUs. There are many manufacturers, but as far as I know the most popular are Atmel and Microchip technology. They manufacture accordingly Atmel AT series MCUs and PIC series MCUs.
By saying that these are the most popular I mean most popular as robot microcontrollers. There are many companies that manufacture microcontrollers, many of them though are made with a specific application in mind.
So, what are those functions a robot microcontroller needs? At least one input with an ADC function. ADC stands for analogue to digital converter. It can be called colloquially as an analog input. Basically, you can connect a device that gives an analogue signal, like a range finder, and the ADC will convert this signal into digital format. This is required so that robot microcontroller could operate with the signal.
Also, you will need digital I/O ports. OK, I think that every microcontroller has them so no worries about that. As you can guess, you can deliver a digital signal to these ports. That would be like yes or no, 0 or 1, etc. With these you can control almost everything – diodes, servos, etc.
Also it is handy if there are integrated timers, clock and other features. But I am not going to get wide on these. My purpose here is to tell you the very basics of the robot microcontrollers.
As you can understand, you cannot really connect something directly to the ICs pins. For example a servo motor. It has three wires – one for power source positive, one for ground, one for signal. So it would be nice to have a connector mounted on the board where you can connect this.
So the MCU itself cannot function fully without some peripheral components. It means that you’d have to make at least a very simple schematic and solder it together to make it work. That would be called an augmented microcontroller. This is the thing that is usually called a robot microcontroller.
Augmented microcontrollers
Of course, you can build your own augmented microcontroller. That is actually the preferred way. That way you will learn many new things, and of course your robot microcontroller would be specifically tailored for your needs.
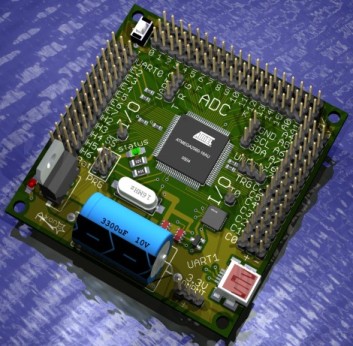
What to do if you don’t want to tamper with electronics too much? There are manufactured and ready to use augmented microcontrollers on the market. Like this one in the picture. It is called Axon and it is made by the society of robots.
These have some handy features already on the board. Like on/off switch or status diodes. Also, as you see it has various connectors already on the board. So, to connect something you just need to plug it in.
Also, one great advantage is that some of these augmented microprocessors have a boot loader. That means that you can program it simply by connecting to the computer. To program a bare MCU you would have to make or buy a device called a programmator.
Prototyping boards
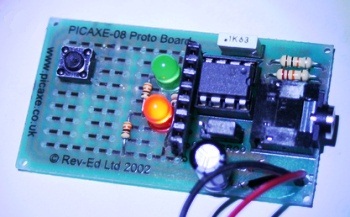
Prototyping or development boards are something like semi-finished augmented microcontrollers. The basics are there for a MCU to run, but you can add components and test your ideas as you wish. It can be useful to buy something like that and modify as you need. For example, you can build a motor controller on the free space.
The cheapest choice is to build an augmented microcontroller yourself. That is, if you don’t fry too many components and get it right. The easiest to use, in my opinion, is a ready-made augmented microcontroller.
If you are willing to know how they work, but can’t figure everything yourself yet, you can buy a microprocessor kit. That is basically an augmented microcontroller, only you have to assemble and solder it yourself. This way you will surely learn what does what on the board.
Of course, there are much more to say about robot microcontrollers. But my idea here is to deliver you the basics in a concentrated form to give you the basic idea of what is what. If you want to go deeper, search the net for microcontrollers and you will find a plethora of info to read and learn.