Raspberry Pi
Before Raspberry Pi appeared on the scene, single board computers in the modern sense of the term were pretty much a niche thing. Arguably they still are a niche thing but the niche has widened considerably because of it.
Raspberry Pi (invoking nice phonetic associations with mathematical pi, edible pie, as well as Py from Python) was created in order to tackle a particular problem. Kids of the mid-nineties to early noughties had lost the kind of interaction with computers that kids of the eighties and early nineties experienced resulting in reduced savviness when applying for computer science university level courses.
In late eighties computers were still pretty much a hobbyist thing. Thus kids who had a computer of a type of Commodore 64 at home usually were free to experiment with it and learn programming given the interest. In late nineties however, things had changed considerably. Having a PC was more of a necessity and parents were more reluctant to let “mess things up” in the family computer. Generally resulting in loss of hands on experience.
To tackle this problem, Raspberry Pi foundation was created with a goal to create an affordable computing platform tailored for education and hands on experience. As technology progressed it was possible to design a fully fledged computer system at a fraction of the cost of a desktop PC on a small form factor.
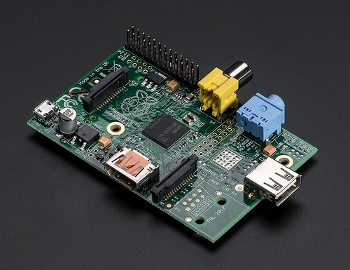
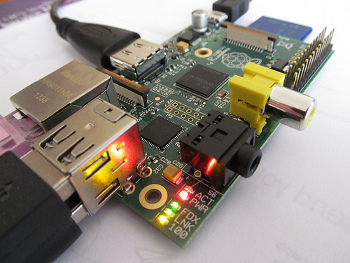
There are two Pi models – Model A and Model B. It should be noted that the naming does not imply succession. Models should rather be perceived as two co-existing flavors of the same system. There are also board revisions that often affect both models.
Both boards are pretty much the same with a few differences. First of all, Model A costs 10 USD less than Model B. Also, Model B has an ethernet port and two USB ports (all being connected to the system on a chip device through a USB hub) while Model A has a single USB port connected directly to the SoC, thus it lacks networking capabilities out of the box.
Other differences include 256 MB SDRAM in case of Model A as opposed to 512 MB SDRAM in Model B and 300 mA (1.5 W) power rating in case of Model A as opposed to 700 mA (3.0W) in case of Model B (with a 5V power source). Otherwise both Raspberries are pretty much the same.
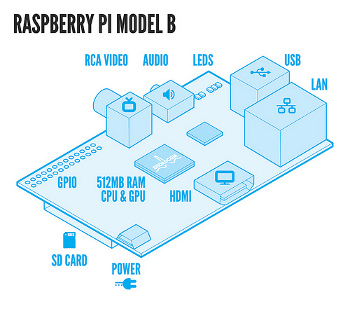
So, Raspberry Pi is based on Broadcom BCM2835 system on a chip featuring a 700 Mhz ARM1176JZF-S CPU (that’s ARMv6 generation) and a Broadcom VideoCore IV @ 250 Mhz GPU. The GPU is quite capable as it’s the same GPU on which Samsung Galaxy S II was based, the CPU on the other hand, can be overclocked to 1 GHz without voiding the warranty.
The slight downside of this chip is that the given CPU is ARMv6 generation. Meaning, that some desirable operating systems that have dropped support of ARM chips older than ARMv7 won’t run on Raspberry Pi. Ubuntu is one such example. This is rectified by the fact that there are quite a few operating systems tailored to Pi’s architecture as well as plenty others that can be run on it.
The operating systems range from general purpose ones such as Debian based Raspbian and fedora based Pidora to solution tailored systems such as OpenELEC media center operating system. Installation of these is made easy by an operating system installation tool NOOBS (pun intended, I guess). Basically, what one has to do is to get the NOOBS image, burn it on an SD card and then just point and click during the first boot.
So, the “hard drive” is an SD memory card. Other interfaces include HDMI, composite video, audio jack as well as a camera interface to be used with a specifically designed camera board. For robotics purposes we are particularly interested in low level peripherals. There are 8 GPIOs, a PWM, a UART, an I2C bus, an I2S bus for audio devices and an SPI bus.
As you see, the board is more multimedia than robotics focused, both in terms of the given SoC device as well as included peripherals. This is so because one of the design drivers was that the board has to be attractive to beginners and people without extensive IT knowledge to get them interested in the field. Multimedia capabilities serve this purpose well as Raspberry Pi can be initially used just for fun without extensive development in mind.
Raspberry Pi’s expansion boards
To use Raspberry Pi for robotics, one surely needs to expand the board’s capabilities a bit. Motors have to be driven, sensors have to be read, etc. Sure, making a custom expansion board for your needs could be the best solution. However, often you can save yourself a lot of hassle by looking what’s already available out there. As Raspberry Pi is such a popular platform, there are some pretty handy expansion boards made for it to make things easier.
Gertboard

First of all I would like to mention the Gertboard. The Gertboard was developed by Gert van Loo who is one of the men behind Raspberry Pi itself. It continues in the educational spirit of Pi itself, meaning that it’s tailored for beginners and comes with plenty of usage examples both in C and in Python.
One could view the Gertboard as an assembly of different functionality blocks that can then be connected to Raspberry Pi’s GPIOs. Not all at the same time as some might need the same pins, but some useful combinations are possible.
So, there are 12 buffered IOs, 3 pushbuttons, 6 open collector drivers, an 18V, 2A motor controller, a two channel 8,10 or 12 bit digital to analog converter, a two channel 10 bit analog to digital converter and last but not least a 28-pin dual in line ATmega microcontroller.
I will not extrapolate on buffered IOs and the motor driver, their use is pretty obvious. However, I would like to say a few things on the included microcontroller. The inclusion of it is pretty interesting. It basically means that the Gertboard is given a mind of its own.
The microcontroller is intended to be programmed using Arduino IDE installed on the Raspberry and flashed through the SPI bus. This effectively extends the Raspberry Pi’s low level peripheral capabilities with the ones present on the given ATmega chip as well as unloads some computation off the Raspberry Pi itself.
The Gertboard comes with plenty of examples both if the functional blocks are used directly from Raspberry Pi and when ATmega is programmed. The documentation is quite easy to follow and quite straightforward. When controlled directly from the Pi, examples are given in C and Python. Programming of the microcontroller is in C/C++ like Arduino language.
Raspberry Pi camera module

The Raspberry Pi has a CSI port, which stands for camera serial interface in case a popular tv series popped into mind. And there’s also a camera module intended to go with it. The module is based on OmniVision OV5647 5 megapixel CMOS image sensor capable of 1080p video output.
It has a fixed focus lense and a ribbon cable that connects directly into the CSI. So much for hardware integration. Regarding software integration everything is quite streamlined as well. There are a few command line applications intended for configuration of the camera as well as shooting still images and videos.
The documentation for the chip as well as command line applications are freely available and is quite extensive. Considering the kind of grind camera integration in electronics projects sometimes can be this is like a breeze of fresh air.
PiFace
PiFace, as other expansion boards connects directly on Raspberry Pi’s GPIO header. The communication between the Raspberry and PiFace is done using the SPI bus, so other GPIO pins are free when this board is used.
PiFace has 4 buttons, 8 digital inputs, 8 open collector outputs and 2 relays. The documentation features usage examples both in C and Python with appropriate interface libraries. Another nice feature is the availability of an emulator. The code can be emulated without the real board connected.
RaspiRobot Board
RaspiRobot board was developed specifically to extend the capabilities of Raspberry Pi to what’s needed for not very complicated robotics applications. The board comes as a solder-yourself kit with all necessary components included.
The RaspiRobot board offers the following functionality: dual bidirectional motor control, 2 open collector outputs, 2 LEDs, 2 switch inputs, a voltage regulator to power Raspberry Pi, a 5V serial connector to be used with appropriate devices, such as a range finder, as well as an I2C connector to communicate with further devices.
A Python library to use these interfaces from the Raspberry is also available. Combined with other Raspberry Pi possibilities some pretty interesting robots can be built using this board.
PiBorg
PiBorg is a line of robotics expansion boards for Raspberry Pi. In the lineup there are TriBorg, PicoBorg, LEDBorg and XLoBorg. You can also find a robot tutorial utilizing these boards on their website.
So, TriBorg triplicates the Raspberry Pi’s GPIO header so that it can be used by multiple devices at the same time. PicoBorg provides 4 outputs, one of which is a PWM. This way either 4 on/off devices can be controlled (solenoids, small motors), where one of these devices can employ PWM, or one 6-wire stepper motor in both directions.
XLoBorg has a 3-axis accelerometer and a 3-axis magnetometer providing acceleration and direction information and LEDBorg adds a bright RGB LED, meaning that the led can display different colors. Might be a neat add-on. All Borgs come with Python libraries and examples.
Of course, this is far from an exhaustive list of Raspberry expansion boards. There are others that might come in handy in different situations. For example, to provide a real time clock, which is not included on the board, etc. However, I feel that the boards I mentioned here are the ones you might be most interested if robot building is your concern.
Raspberry Pi based robots
Due to the initial hype around this single board computer and the large community, there are quite a few hobbyist robots based on the Raspberry Pi. Examples can be found both on forums and sites dedicated to Pi, as well as in forums and sites dedicated to hobbyist robotics.
Apart from hobbyist robots that often use a combination of above mentioned expansion boards and custom solutions to interface sensors and actuators, there are a few commercial developments based on Raspberry Pi. Both that I would like to mention have been funded on Kickstarter.
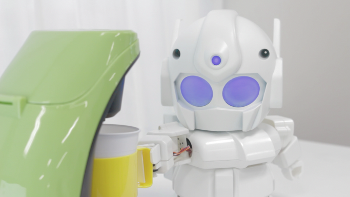
RAPIRO is a low-cost humanoid robot kit based on Pi. Judging from the information on Kickstarter, it’s would be price is around 230 GBP. It has 12 servo motors controlled via a servo control board and an RGB LED board. The robot is designed so that the camera module can be mounted in the head, opening more usage possibilities.
Another really interesting robot based on Raspberry Pi is Ziphius. Just as RAPIRO, initial manufacturing was funded through a Kickstarter campaign. Ziphius is a floating drone that can travel up to 6 MPH. It can be controlled through android and iOS devices using WiFi.
Ziphius can record 1080p video and stream 720p video. Judging by the information on Kickstarter, the price point should be below 300 USD. This seems like a pretty interesting development where the media capabilities of Raspberry Pi are properly utilized and combined with the momentum of mobile platform development.
A few notes on Raspberry Pi use in robotics
First of all, it is important to note that Raspberry Pi was not developed *for* robotics. Its design goal was and still is a cheap hands on platform for education. To fulfill this goal an important design driver was increased multimedia capability. Thus the chosen system on a chip.
That being said, the Raspberry can successfully be used for robotics as shown by the few examples above. So, what are the pros and cons of this single board computer if compared to other devices on the market?
First of all, a major plus of this device is the strong community around it. I would even dare to say that the community of Raspberry Pi is the biggest single board computer community out there. This is quite understandable, taking into consideration the amount of anticipation and hype this board created when being released.
Second, it is very user friendly if compared to most single board computers on the market. This is so thanks to the fact that it was created for education having people without extensive previous knowledge in the field in mind. As opposed to a lot of other single board computers whose roots stem from development platforms targeted at embedded systems’ professionals.
One of the downsides is that the low level peripheral interfacing capabilities are not especially extensive and a situation where you need more of them is not unimaginable. This can effectively limit the complexity of a Pi based robot. This can be rectified using additional microcontrollers and their capabilities. The question is whether the initial user friendliness of the Raspberry outweighs the additional development that might be needed.
Another potential downside might arise if you happen to have to dig deeper. The documentation is arguably not as extensive as that of some competitors (notably – BeagleBone Black). And the full documentation of the system on a chip used in the Pi is not freely available. Again, one has to bear in mind that it was not created as a development platform, rather it was created as an educational tool.
So, if you have a certain robotics project in mind and you can identify what capabilities are needed then you can easily weigh which system would be better. For example, for a robotic rover that has to be able to record high quality video, the Raspberry Pi might just be the right platform to use because of its GPU and ease of camera integration. On the other hand, if your project requires multiple motors to be run through PWM, a plethora of GPIOs and multiple I2Cs, then Raspberry clearly is not the best option for the job.
Generally, if you would seek for a single board computer to use purely for robotics, it might be beneficial to check out the competition. However, if you just want to fiddle around with things and you might also want to build a robot, then Raspberry Pi might be the right thing to spend a few dollars on. And of course, if you happen to own a Raspberry, there’s no reason why you shouldn’t try to turn it into robot’s brains.
Find out about other single board computers.